
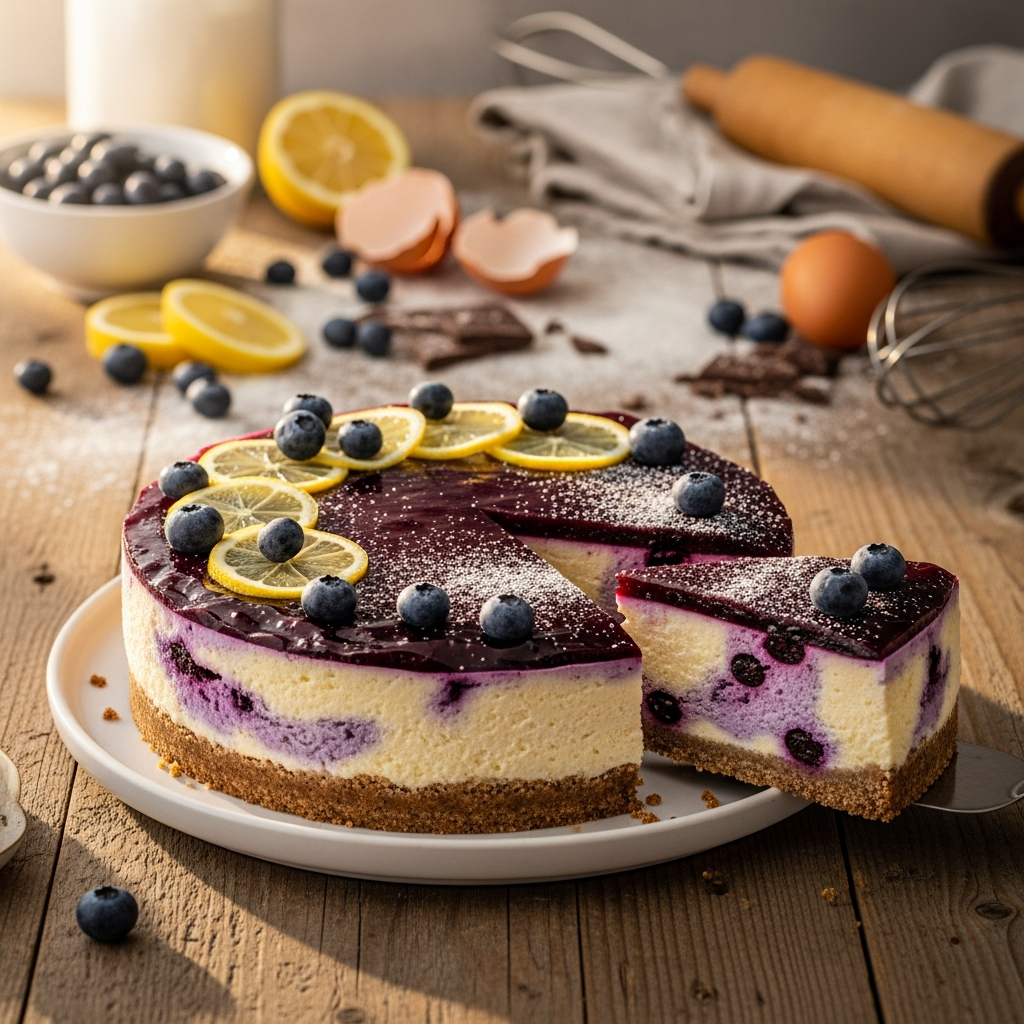
There are few desserts as universally beloved and satisfying as a truly great cheesecake. And when it comes to cheesecake, the New York style reigns supreme. Known for its distinctively dense, rich, and ultra-creamy texture, resting atop a buttery graham cracker crust, it’s a dessert that speaks of indulgence and tradition. Forget the light, airy versions; a New York style cheesecake is a serious commitment to deliciousness. This comprehensive guide will walk you through every step, ensuring you achieve the perfect New York style cheesecake that will impress even the most discerning dessert connoisseurs. Get ready to bake a slice of pure heaven!
Ingredients
To craft the most decadent and authentic New York Style Cheesecake, quality ingredients are paramount. Ensure all dairy products are full-fat and brought to room temperature before beginning, as this is crucial for a smooth, lump-free filling.
For the Graham Cracker Crust:
- 1 ½ cups (approximately 180g) Graham Cracker Crumbs: Finely crushed, about 10-12 full sheets of graham crackers. You can also use digestive biscuits or shortbread for a twist.
- ¼ cup (50g) Granulated Sugar: To add a touch of sweetness to the crust.
- 6 tablespoons (85g) Unsalted Butter: Melted, which binds the crumbs together beautifully.
- Pinch of Salt: To enhance the flavor of the crust.
For the Cheesecake Filling:
- 32 ounces (900g) Full-Fat Cream Cheese: Four 8-ounce blocks, absolutely essential to be at room temperature for a smooth consistency. Philadelphia brand is highly recommended for its richness.
- 1 ¾ cups (350g) Granulated Sugar: Provides the perfect balance of sweetness to the tangy cream cheese.
- ¼ cup (60ml) Heavy Cream or Sour Cream: Adds extra richness and tang, contributing to the signature creamy texture. Ensure it’s at room temperature.
- 1 tablespoon (15ml) Pure Vanilla Extract: Use good quality vanilla for the best flavor.
- 1 teaspoon Lemon Zest (optional): Freshly grated, brightens the flavor without making it taste lemony.
- ¼ teaspoon Salt: Balances the sweetness and enhances other flavors.
- 4 Large Eggs: Room temperature. Incorporate one at a time to ensure even mixing.
- 1 Large Egg Yolk: Adds extra richness and helps with the dense texture. Room temperature.
For the Optional Sour Cream Topping (if not using water bath or for extra creaminess):
- 1 cup (240ml) Sour Cream: Full-fat, room temperature.
- 2 tablespoons (25g) Granulated Sugar: For sweetness.
- ½ teaspoon Pure Vanilla Extract: For flavor.
Instructions
Baking the perfect New York style cheesecake is an art that requires patience and precision. Follow these steps carefully for a flawless, crack-free result.
Step 1: Prepare Your Pan and Oven
- Preheat your oven to 350°F (175°C).
- Grease a 9-inch springform pan lightly with butter or cooking spray.
- Prepare for Water Bath: Tear off three large pieces of heavy-duty aluminum foil (about 20-24 inches long). Overlap them to create a wide, sturdy triple-layer sheet. Place the springform pan in the center and wrap the foil tightly around the bottom and up the sides of the pan. Ensure there are no gaps for water to seep in. This foil barrier is crucial for the water bath method, which helps prevent cracks and ensures an evenly baked, creamy cheesecake.
Step 2: Make the Graham Cracker Crust
- In a medium bowl, combine the graham cracker crumbs, granulated sugar, and salt. Stir until well mixed.
- Pour in the melted butter and stir until the crumbs are evenly moistened and resemble wet sand.
- Press the mixture firmly and evenly into the bottom of the prepared springform pan. Use the bottom of a flat glass or measuring cup to create a compact crust.
- Bake the crust for 8-10 minutes, or until lightly golden. This pre-baking step helps create a crisp crust that won’t get soggy.
- Remove the pan from the oven and let it cool on a wire rack while you prepare the filling. Reduce oven temperature to 325°F (160°C).
Step 3: Prepare the Cheesecake Filling
- In the bowl of a stand mixer fitted with the paddle attachment (or using a large bowl and electric hand mixer), beat the softened cream cheese on medium-low speed for about 2-3 minutes until completely smooth and lump-free. It’s vital that the cream cheese is at room temperature to achieve this consistency. Scrape down the sides of the bowl often.
- Gradually add the granulated sugar to the cream cheese, beating on low speed until just combined and smooth, about 2-3 minutes. Again, scrape down the sides. Do not overbeat, as incorporating too much air can lead to cracks.
- Add the heavy cream (or sour cream), vanilla extract, lemon zest (if using), and salt. Beat on low speed until just incorporated.
- Add the eggs and egg yolk, one at a time, mixing on the absolute lowest speed just until each egg is incorporated. Stop mixing as soon as the yolk disappears. Overmixing at this stage is the primary cause of cracks in cheesecake. Be gentle and patient.
- Give the mixture one last gentle scrape down with a spatula to ensure everything is combined. The filling should be silky smooth.
Step 4: Bake the Cheesecake with a Water Bath
- Pour the cheesecake filling over the cooled graham cracker crust in the foil-wrapped springform pan. Gently tap the pan on the counter a few times to release any large air bubbles.
- Place the foil-wrapped springform pan inside a larger roasting pan.
- Carefully pour hot water into the roasting pan until it reaches about halfway up the sides of the springform pan. The water bath provides a moist, gentle baking environment, which is key to a smooth, creamy texture and helps prevent cracking.
- Carefully transfer the roasting pan with the cheesecake to the preheated oven.
- Bake for 70-90 minutes, or until the edges are set, but the center 2-3 inches still have a slight jiggle when gently shaken. An instant-read thermometer inserted into the center should register 150°F (66°C). Avoid opening the oven door unnecessarily during baking.
Step 5: Cool the Cheesecake (Crucial for No Cracks!)
- Once baked, turn off the oven but leave the cheesecake inside with the oven door propped open a few inches. Let it cool slowly in the water bath within the oven for at least 1 hour. This gradual cooling process is paramount for preventing surface cracks.
- After 1 hour, carefully remove the roasting pan from the oven. Take the springform pan out of the water bath and gently remove the foil wrapping. Be cautious as the pan will still be hot.
- Place the cheesecake on a wire rack and let it cool completely to room temperature, which will take another 2-3 hours.
- Once at room temperature, cover the cheesecake loosely with plastic wrap and refrigerate for at least 6-8 hours, or preferably overnight. Chilling is essential for the cheesecake to fully set and achieve its characteristic dense, creamy texture. This step also allows the flavors to meld beautifully, making for the truly perfect New York style cheesecake.
Step 6: Optional Sour Cream Topping (if desired)
- If you choose to add an additional sour cream topping, whisk together the sour cream, sugar, and vanilla extract in a small bowl until smooth.
- Once the cheesecake has completely cooled and chilled, spread the sour cream mixture evenly over the top.
- Refrigerate for another 30 minutes to allow the topping to set.
Step 7: Serve Your Masterpiece
- Before serving, run a thin knife around the edge of the cheesecake to loosen it from the pan. Unclasp the springform pan and carefully lift off the ring.
- Slice with a hot, dry knife (wipe the knife clean and warm it with hot water between each slice) for clean, perfect slices.
- Serve plain, or with fresh berries, fruit compote, chocolate sauce, or a dollop of whipped cream. Enjoy your incredible homemade perfect New York style cheesecake!
Tips & Tricks for the Perfect New York Style Cheesecake
Achieving the legendary status of a truly perfect New York style cheesecake is well within your reach with these expert tips:
- Room Temperature Ingredients are Non-Negotiable: This is arguably the most crucial tip. Cold cream cheese, eggs, or sour cream will lead to lumps in your batter and require excessive mixing to smooth out, which in turn incorporates too much air. Too much air causes cheesecakes to puff up excessively in the oven and then collapse and crack as they cool. Plan ahead and take your ingredients out of the fridge at least 2-3 hours before baking.
- Do Not Overmix: This bears repeating. Mix only until ingredients are just combined. Once you add the eggs, mix on the lowest speed possible, just until the yellow disappears. Overmixing develops gluten in the eggs, creates air bubbles, and can lead to a crumbly texture and cracks.
- The Power of the Water Bath: A water bath (bain-marie) is your best friend for a creamy, crack-free cheesecake. It provides a moist, even heat that prevents the edges from drying out and baking faster than the center, thus reducing the risk of cracks and ensuring a uniform, custardy texture. Make sure your foil wrap is absolutely watertight!
- Slow and Gentle Cooling is Key: Sudden temperature changes are the enemy of cheesecake. The gradual cooling process in the oven, followed by cooling at room temperature, then thorough refrigeration, allows the cheesecake to set without contracting too rapidly, which is a common cause of cracks.
- Use Full-Fat Cream Cheese: For that signature dense, rich, and creamy New York style texture, only full-fat cream cheese will do. Lower-fat versions have higher water content and won’t yield the same luxurious result.
- Don’t Peek Too Often: Resist the urge to open the oven door during baking. Each time you do, you cause a temperature drop that can disrupt the delicate baking process and potentially lead to cracking.
- How to Tell When It’s Done: The cheesecake is ready when the edges are set and slightly puffed, but the center (about a 2-3 inch circle) still jiggles ever so slightly when you gently shake the pan. It will continue to cook and set as it cools. Overbaking will result in a dry texture and increased risk of cracks.
- Prepare Your Pan Properly: A springform pan is essential. Ensuring it’s well-greased and securely wrapped in heavy-duty foil for the water bath will prevent sticking and water seepage.
- For Clean Slices: To get beautifully neat slices, chill your cheesecake thoroughly. Use a long, sharp knife dipped in hot water and wiped dry between each slice. This warms the blade, allowing it to glide through the dense cheesecake cleanly.
- Patience is a Virtue: This recipe isn’t quick, especially with all the chilling time. But the wait is absolutely worth it for a truly impressive and delicious perfect New York style cheesecake.
Variations
While the classic is undeniably sublime, the beauty of cheesecake lies in its versatility. Once you’ve mastered the perfect New York style cheesecake, feel free to experiment with these delicious variations:
- Chocolate Swirl Cheesecake: Melt 4 ounces of semi-sweet chocolate and swirl it into the batter just before baking. Use a knife or skewer to create elegant patterns.
- Oreo Cookie Crust: Replace graham cracker crumbs with 1 ½ cups of crushed Oreo cookies (filling included) and combine with 5 tablespoons of melted butter.
- Lemon Raspberry Cheesecake: Increase lemon zest in the filling to 2 teaspoons and add a swirl of raspberry puree (made by blending fresh raspberries and straining) to the top of the cheesecake before baking. Garnish with fresh raspberries after chilling.
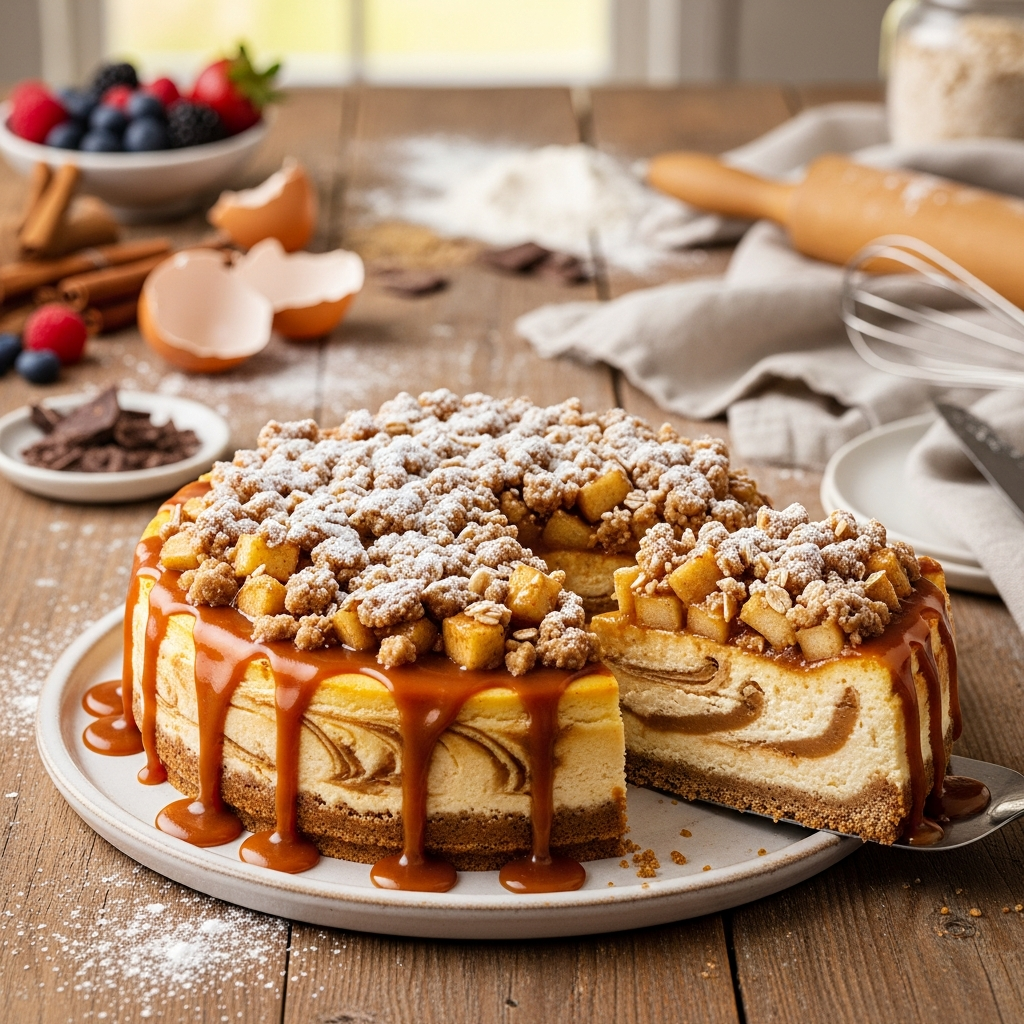
- Caramel Pecan Cheesecake: Drizzle homemade or store-bought caramel sauce over the chilled cheesecake and sprinkle with toasted pecans.
- Pumpkin Spice Cheesecake (Seasonal): Reduce sugar slightly and incorporate 1 cup of pumpkin puree, 1 teaspoon of ground cinnamon, ½ teaspoon of ground nutmeg, ¼ teaspoon of ground ginger, and a pinch of cloves into the filling. Perfect for autumn!
- Espresso/Coffee Cheesecake: Dissolve 2 tablespoons of instant espresso powder or very strong instant coffee in 1 tablespoon of hot water, then mix into the cream cheese filling along with the vanilla.
- Mixed Berry Compote Topping: Simmer 2 cups of mixed berries (fresh or frozen) with ¼ cup sugar and 1 tablespoon lemon juice until slightly thickened. Cool completely and spoon over slices of cheesecake.
- Gluten-Free Cheesecake: Simply use gluten-free graham crackers for the crust. The filling is naturally gluten-free.
- Mini Cheesecakes: Line a muffin tin with paper liners. Press crust into the bottom of each liner, then fill with cheesecake batter. Bake at 325°F (160°C) for 20-25 minutes, omitting the water bath (though a small pan of water on the bottom rack can still help with moisture).
FAQ
Baking cheesecake can sometimes lead to questions. Here are answers to some common concerns you might encounter while striving for the perfect New York style cheesecake:
Q1: Why did my cheesecake crack on top?
Cracks are the most common complaint when baking cheesecakes, and they typically stem from a few culprits: overmixing the batter (incorporating too much air), overbaking (drying out the surface), or sudden temperature changes during cooling. To avoid cracks, ensure all ingredients are at room temperature, mix on low speed just until combined, use a water bath, and allow the cheesecake to cool slowly in the oven with the door propped open before bringing it to room temperature and then chilling.
Q2: How do I know when my New York style cheesecake is done baking?
The cheesecake is perfectly baked when the edges are set and slightly puffed, but the very center (a circle about 2-3 inches in diameter) still has a slight, delicate jiggle when you gently shake the pan. If the entire cheesecake is firm and no longer jiggles, it’s likely overbaked. It will continue to set as it cools and chills. An instant-read thermometer inserted into the center should read around 150°F (66°C) for optimal doneness.
Q3: Can I make this cheesecake ahead of time? How long does it last?
Absolutely, New York style cheesecake is an excellent make-ahead dessert! In fact, it often tastes even better the next day as the flavors have more time to meld and deepen. It requires a minimum of 6-8 hours of chilling, but overnight is ideal. Properly stored in an airtight container or tightly wrapped with plastic wrap, it will last in the refrigerator for 5-7 days.
Q4: Do I really need to use a water bath? What happens if I don’t?
While you can bake a cheesecake without a water bath, it is highly recommended, especially when aiming for the perfect New York style cheesecake. A water bath creates a moist, humid environment in the oven, which ensures the cheesecake bakes slowly and evenly. This prevents the edges from drying out and cracking and contributes to the incredibly creamy, custardy texture that New York style cheesecakes are known for. Without it, you risk a drier, potentially cracked cheesecake.
Q5: Can I freeze leftover cheesecake?
Yes, cheesecake freezes beautifully! For best results, allow the cheesecake to chill completely in the refrigerator first. Then, you can freeze individual slices or the whole cheesecake (without any fresh fruit toppings). Wrap slices tightly in plastic wrap, then again in aluminum foil, or place them in an airtight freezer-safe container. It can be stored in the freezer for up to 1-2 months. Thaw frozen cheesecake in the refrigerator overnight before serving.
References
- Wikipedia: Cheesecake History and Varieties
- Philadelphia Cream Cheese: Cheesecake Inspirations
- Serious Eats: Cheesecake Science and Techniques
- King Arthur Baking: Preventing Cheesecake Cracks
- Food Network: Classic New York Cheesecake
For more sweet inspiration, visit Dessert Circle daily!
“`
Leave a Reply