
The Ultimate Apple Cider Doughnut Cake: A Perfect Taste of Fall
Estimated reading time: 7–9 minutes | Prep time: 25 minutes | Total time: 2 hours
Key Takeaways
- Intense Autumn Flavor: This cake boasts a deep, authentic apple flavor thanks to a homemade apple cider reduction, perfectly complemented by warm spices like cinnamon, nutmeg, and allspice.
- Incredibly Moist Crumb: The combination of buttermilk and oil creates an exceptionally tender and moist cake crumb that stays fresh for days.
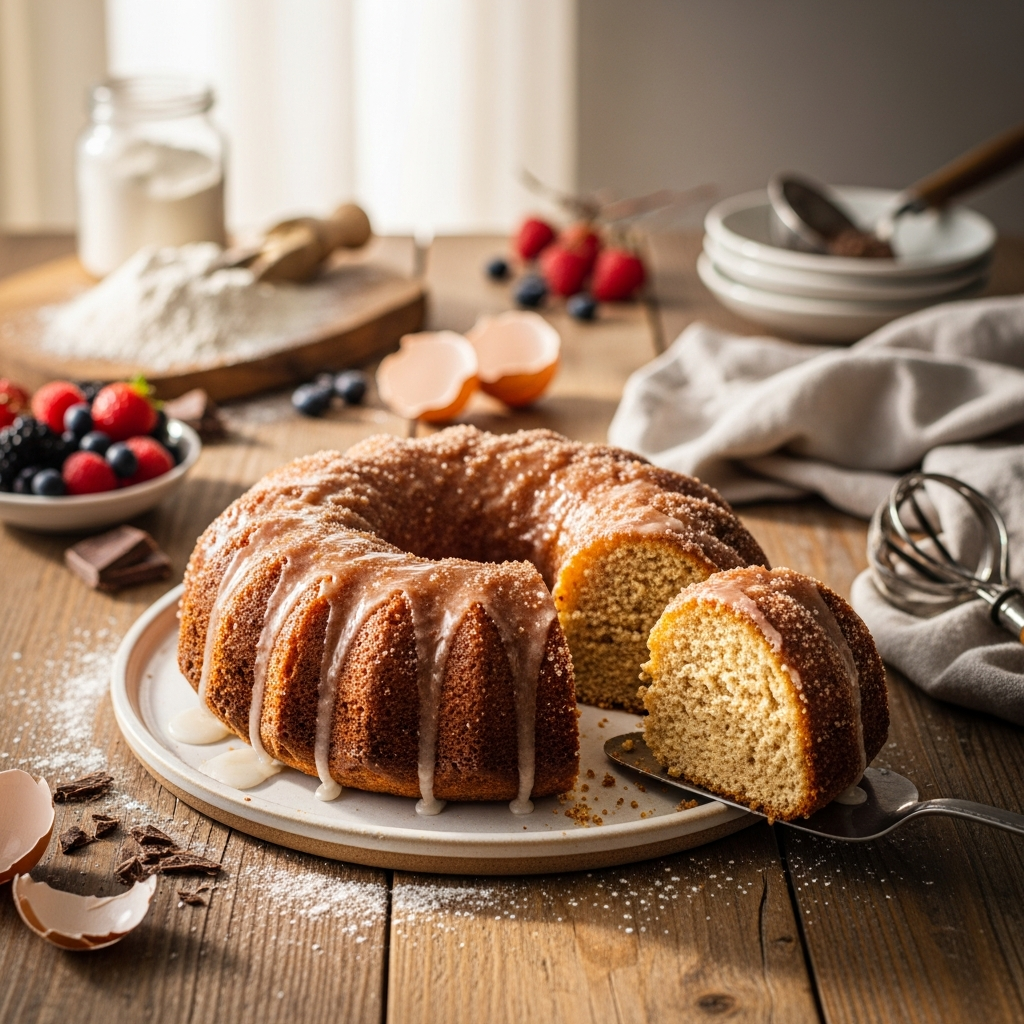
- Signature Crunchy Topping: A generous coating of melted butter and cinnamon-sugar gives this cake the classic, irresistible crust of a real apple cider doughnut.
- Make-Ahead & Freezer-Friendly: A perfect dessert for planning ahead. The cake freezes beautifully, making it an ideal choice for holiday gatherings or future cravings.
- Versatile & Crowd-Pleasing: Serve it for breakfast with coffee, as an afternoon snack, or as a show-stopping yet simple recipe for any family-friendly dessert occasion.
Table of Contents
Why You’ll Love This Apple Cider Doughnut Cake Recipe
If you’ve ever dreamed of capturing the cozy, nostalgic essence of a crisp autumn day in a single dessert, this homemade Apple Cider Doughnut Cake is the answer. It’s a simple recipe that transforms the beloved flavors of a fresh-from-the-fryer cider doughnut into a beautiful, shareable bundt cake. Imagine a perfectly tender, moist cake infused with the concentrated tang of real apple cider and a warm blend of cinnamon, nutmeg, and allspice. To top it all off, a crunchy, sparkling cinnamon-sugar crust envelops the entire cake, delivering that signature doughnut texture and taste in every single bite.
What makes this recipe truly special is its ability to deliver show-stopping results with straightforward, from-scratch methods. We start by creating an intense apple cider reduction, which is the secret to packing authentic, robust apple flavor into the batter without watering it down. The cake itself is incredibly forgiving, achieving a perfect texture that’s rich but not heavy. It’s the ultimate family-friendly dessert, equally at home on a holiday brunch table as it is with a cup of tea on a quiet afternoon. This is more than just a cake; it’s an experience that will fill your kitchen with the most incredible autumn aromas and become a treasured fall tradition.
Ingredients You’ll Need
Using high-quality, room-temperature ingredients is the key to achieving the perfect texture in this Apple Cider Doughnut Cake. The apple cider reduction and buttermilk are non-negotiable for that authentic flavor and moist crumb!
- For the Apple Cider Reduction:
- 2 cups (480ml) fresh, unfiltered apple cider
- For the Cake Batter:
- 3 cups (360g) all-purpose flour
- 1 1/2 teaspoons baking powder
- 1/2 teaspoon baking soda
- 1 teaspoon salt
- 2 teaspoons ground cinnamon
- 1/2 teaspoon ground nutmeg
- 1/4 teaspoon ground allspice
- 1/2 cup (113g) unsalted butter, at room temperature
- 1 cup (200g) granulated sugar
- 1/2 cup (110g) packed light brown sugar
- 3 large eggs, at room temperature
- 1/2 cup (120ml) vegetable or canola oil
- 1 tablespoon vanilla extract
- 1/2 cup (120g) buttermilk or full-fat sour cream, at room temperature
- For the Cinnamon-Sugar Topping:
- 1/2 cup (113g) unsalted butter, melted
- 1 cup (200g) granulated sugar
- 2 teaspoons ground cinnamon
Step-by-Step Instructions
- Step 1: Reduce the Apple Cider. Pour the 2 cups of apple cider into a small saucepan. Bring to a simmer over medium heat and allow it to gently bubble for 15-20 minutes. The liquid should reduce by half, leaving you with about 1 cup of a more syrupy, concentrated cider. This step is crucial for flavor! Set it aside to cool completely.
- Step 2: Preheat Oven and Prepare Pan. Preheat your oven to 350°F (175°C). Meticulously grease and flour a 10-cup bundt pan. Use a baking spray with flour or coat every nook with softened butter and dust with flour, tapping out the excess. A well-prepared pan is the secret to a clean release.
- Step 3: Whisk Dry Ingredients. In a large mixing bowl, whisk together the all-purpose flour, baking powder, baking soda, salt, cinnamon, nutmeg, and allspice. Whisking for at least 30 seconds ensures the leavening agents and spices are evenly distributed for a consistent rise and flavor.
- Step 4: Cream Butter and Sugars. In the bowl of a stand mixer fitted with the paddle attachment (or with a hand mixer), beat the room-temperature butter, granulated sugar, and brown sugar on medium-high speed for 3-4 minutes. The mixture should become very light, pale, and fluffy. This process incorporates air, which leads to a lighter cake.
- Step 5: Add Eggs and Wet Ingredients. Add the eggs one at a time, beating well after each and scraping down the sides of the bowl. With the mixer on low, slowly stream in the vegetable oil, vanilla extract, and the completely cooled apple cider reduction. Mix just until combined.
- Step 6: Alternate Flour and Buttermilk. With the mixer on its lowest speed, add the dry ingredients in three additions, alternating with the buttermilk in two additions (Dry, Buttermilk, Dry, Buttermilk, Dry). Mix only until the last streaks of flour disappear. Do not overmix, as this will result in a dense, tough cake.
- Step 7: Bake to Perfection. Pour the batter into your prepared bundt pan and smooth the top with a spatula. Bake for 45-55 minutes. The cake is done when a wooden skewer inserted into the center comes out with a few moist crumbs attached, but no wet batter.
- Step 8: Cool and Invert. Let the cake cool in the bundt pan on a wire rack for exactly 10 minutes. This is the sweet spot; any less and it might fall apart, any more and the sugars may stick. After 10 minutes, confidently invert the cake onto the wire rack to finish cooling.
- Step 9: Apply the Doughnut Topping. While the cake is still quite warm, prepare the topping. In a small bowl, stir together the granulated sugar and cinnamon. Using a pastry brush, coat the entire cake—top and sides—with the melted butter. Immediately, be generous and sprinkle the cinnamon-sugar mixture all over the buttered cake, ensuring it’s fully coated.
- Step 10: Final Cool and Serve. Allow the cake to cool completely on the wire rack. The topping will set and form a delightfully crunchy crust as it cools. Once cool, slice, serve, and enjoy the wonderful flavors of your homemade doughnut cake!
Baking Tips, Variations & Substitutions
Pro Tips for the Perfect Apple Cider Doughnut Cake
- Room Temperature is Key: For a smooth, uniform batter, ensure your butter, eggs, and buttermilk are all at room temperature. This allows them to emulsify properly, trapping air and creating a light, tender crumb.
- Don’t Skip the Cider Reduction: This is the most important step for achieving a deep, authentic apple flavor. Regular apple cider or juice simply won’t provide the same intensity. Be patient and let it simmer down.
- Measure Flour Correctly: For the best results, use a kitchen scale. If you don’t have one, use the “spoon and level” method: spoon the flour into your measuring cup until it’s overflowing, then level it off with the back of a knife. This prevents a dense, dry cake.
- Avoid Overmixing at All Costs: Once you add the flour, mix on the lowest speed and only until it’s just combined. Overmixing develops gluten, which is the enemy of a soft cake, leading to a tough and chewy texture.
Easy Variations & Substitutions
- Add a Glaze: For an extra layer of flavor, drizzle the cooled cake with a simple maple glaze (1 cup powdered sugar mixed with 2-3 tablespoons of maple syrup) or a tangy buttermilk glaze.
- Incorporate Nuts: For added texture and nutty flavor, fold 1 cup of toasted, chopped pecans or walnuts into the batter at the very end.
- Buttermilk Substitute: No buttermilk? No problem! Make a DIY version by adding 1/2 tablespoon of lemon juice or white vinegar to 1/2 cup of whole milk. Let it sit for 5-10 minutes until it curdles slightly. Full-fat sour cream or plain yogurt also work as a 1:1 substitute.
- Pan Alternatives: If you don’t have a bundt pan, this recipe can be baked in a 9×13-inch pan or two 9-inch round cake pans. Note that the baking time will likely be shorter, so start checking for doneness around the 30-35 minute mark.
How to Serve & Store Your Apple Cider Doughnut Cake
This cake is absolutely delicious on its own, served slightly warm or at room temperature. The crunchy cinnamon-sugar crust provides all the texture and sweetness it needs. For an extra decadent treat, serve a slice with a scoop of vanilla bean ice cream or a generous dollop of freshly whipped cream. To store your Apple Cider Doughnut Cake, place it in an airtight container or cover it tightly with plastic wrap. It will stay wonderfully moist at room temperature for up to 3 days. While it can be refrigerated for up to a week, the texture is best when brought back to room temperature before serving. You can gently re-warm individual slices in the microwave for 10-15 seconds to bring back that fresh-baked feel.
If you loved this fall-inspired recipe, you might also want to try our famously moist banana bread next!
Watch: How to Make It


Frequently Asked Questions
Can I make this Apple Cider Doughnut Cake ahead of time?
Absolutely! This cake is a great make-ahead option. You can bake the cake a day in advance, let it cool completely, and store it tightly covered at room temperature. Apply the melted butter and cinnamon-sugar topping just before you plan to serve it for the best crunchy texture.
Can I freeze this recipe?
Yes, this cake freezes wonderfully. For the best results, freeze the cake without the topping. Wrap the completely cooled, untopped cake in two layers of plastic wrap and a final layer of aluminum foil. It can be frozen for up to 3 months. Thaw it overnight at room temperature, then apply the butter and cinnamon-sugar topping before serving.
Can I reduce the sugar in this recipe?
While sugar contributes to both flavor and moisture, you can reduce the granulated sugar in the cake batter by about 1/4 cup (50g) without a major impact. The cake might be slightly less tender. We do not recommend reducing the sugar in the topping, as it is essential for creating the signature “doughnut” crust.
Why did my bundt cake stick to the pan?
Bundt cakes can be tricky. Sticking usually happens for two reasons: the pan wasn’t greased thoroughly enough, or the cake was left to cool in the pan for too long (more than 10-15 minutes). Use a baking spray with flour or the butter-and-flour method, and be sure to get into every single crevice. Inverting it after the 10-minute rest is crucial.
What is the best type of apple cider to use?
For the most potent flavor, use a fresh, unfiltered apple cider, often found in the refrigerated section of the grocery store during the fall. Avoid using sparkling cider or clear apple juice, as they lack the depth of flavor needed for this recipe.