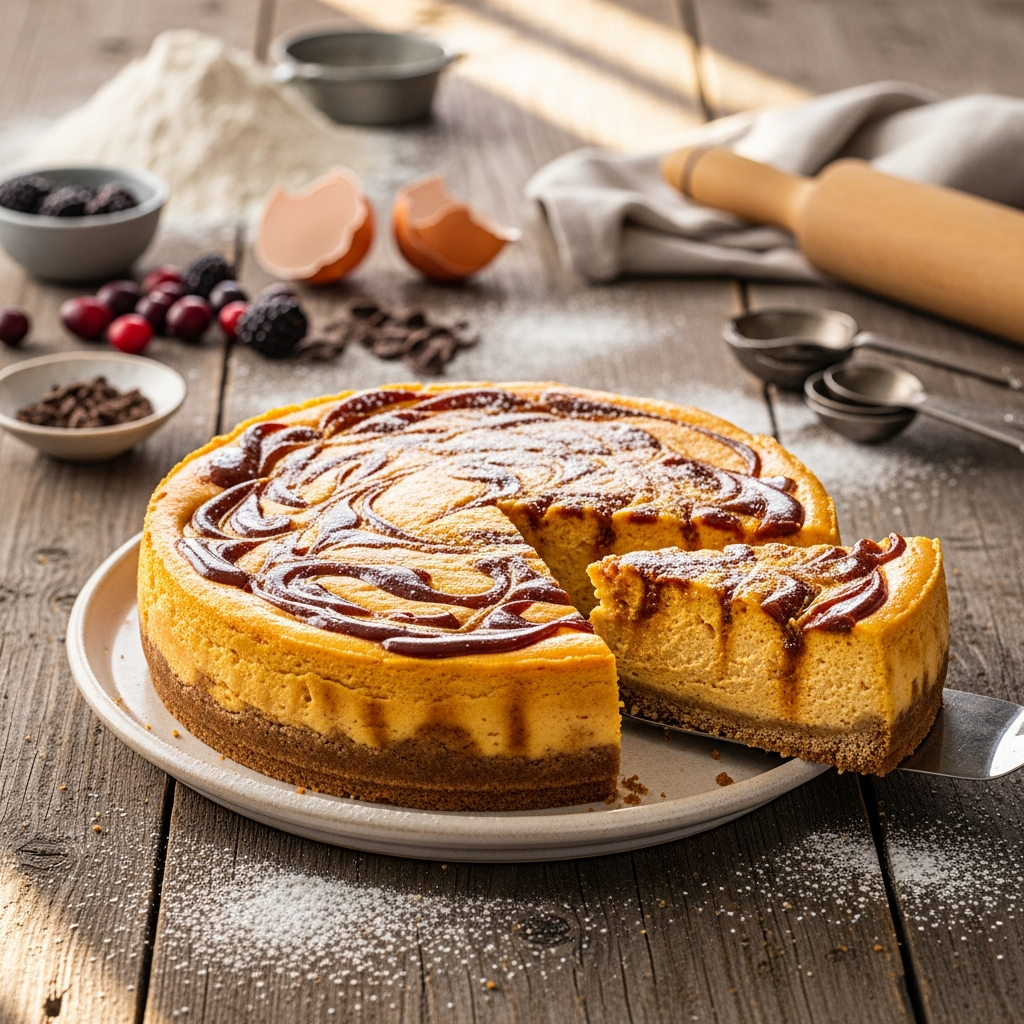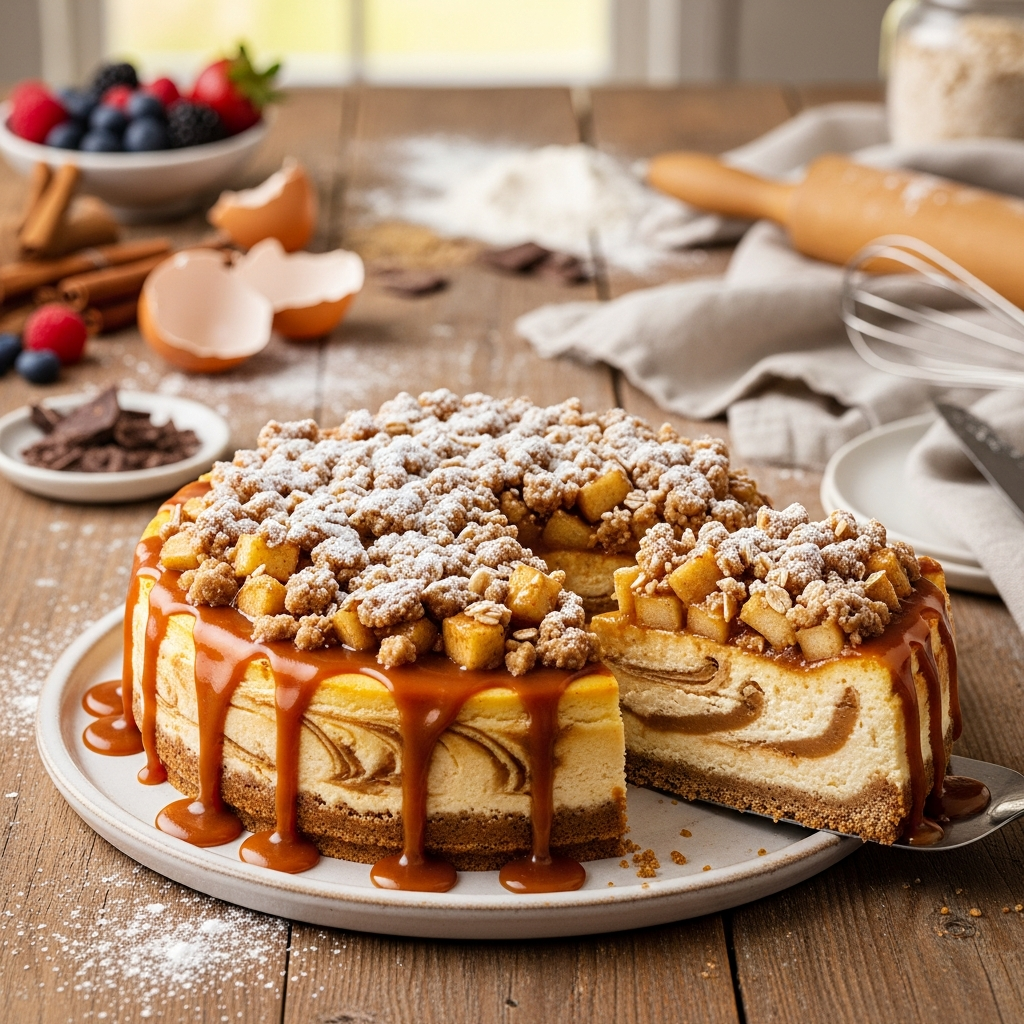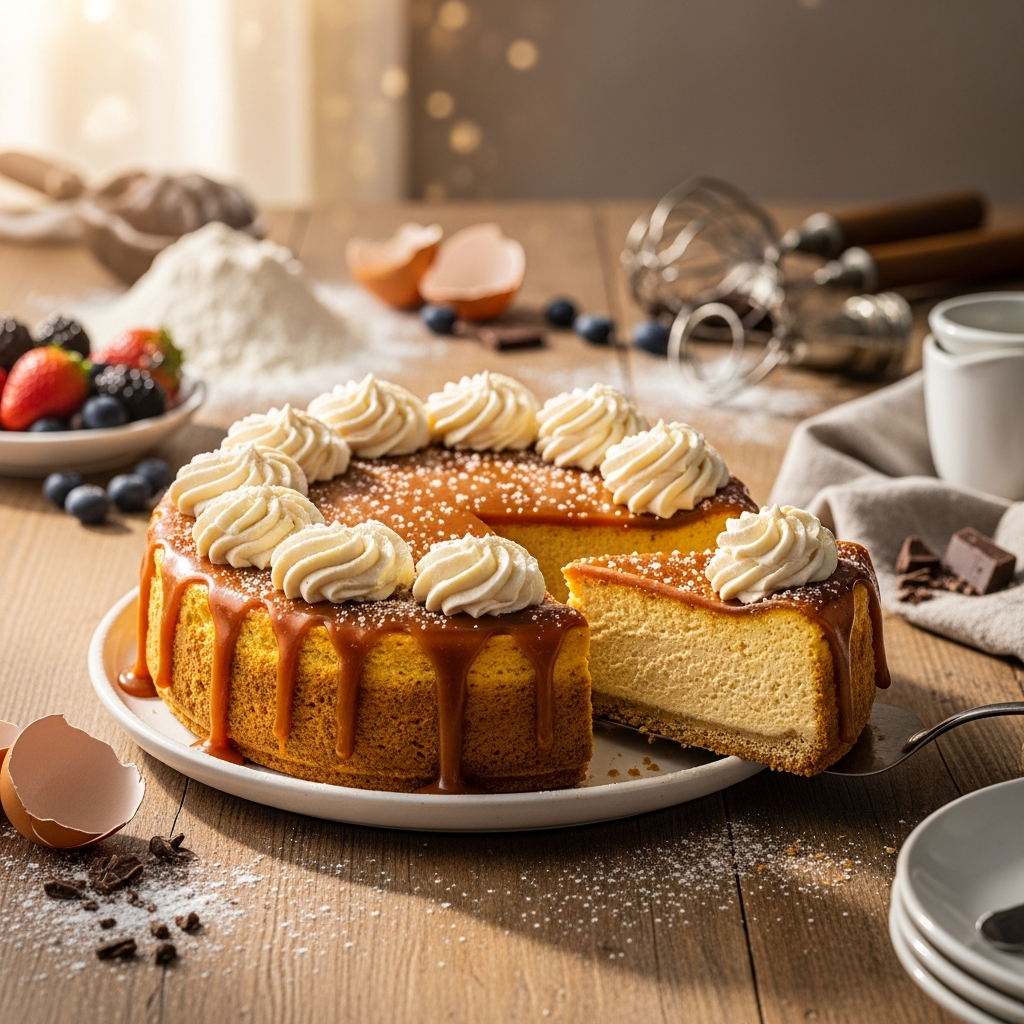
The Ultimate Salted Caramel Pumpkin Cheesecake: A Perfect Fall Dessert
Estimated reading time: 7 minutes | Prep time: 40 minutes | Total time: 2 hours (plus chilling)
Key Takeaways
- Unforgettable Flavor Profile: Experience the perfect balance of creamy, tangy pumpkin cheesecake, a spicy gingersnap cookie crust, and a rich, homemade salted caramel sauce.
- Silky Smooth Texture: Our guide emphasizes critical techniques like using room temperature ingredients and a water bath to achieve a flawless, crack-free, and incredibly creamy cheesecake every time.
- Perfect for Entertaining: This show-stopping dessert is designed to be made ahead, making it an ideal, stress-free choice for Thanksgiving, holiday parties, or any special fall occasion.
- Versatile & Customizable: Learn simple variations, including how to make this recipe gluten-free, and discover the best ways to serve and store your masterpiece for days of enjoyment.
Table of Contents
Why You’ll Love This Salted Caramel Pumpkin Cheesecake Recipe
Welcome to the epitome of autumn desserts. This isn’t just any pumpkin cheesecake; it’s a decadent, multi-layered experience that will become your go-to recipe for the fall season. Our Salted Caramel Pumpkin Cheesecake combines the warm, comforting spices of pumpkin with the rich tang of cream cheese, all nestled on a crisp, spicy gingersnap crust. The crowning glory is a homemade salted caramel sauce that cascades over the top, adding a perfect touch of sweet and salty complexity.
What makes this homemade recipe truly special is its texture. By following our detailed instructions, particularly the use of a water bath and a slow cooling process, you’ll achieve a cheesecake that is unbelievably creamy, dense, and velvety smooth, without a single crack in sight. It’s a showstopper dessert that looks like it came from a high-end bakery but is surprisingly achievable in your own kitchen. Whether you’re planning a holiday feast for Thanksgiving or simply craving a cozy, family-friendly dessert to celebrate the season, this cheesecake is guaranteed to impress.
Ingredients You’ll Need
Using high-quality, room temperature ingredients is the first step to creating the perfect Salted Caramel Pumpkin Cheesecake. Here’s exactly what you’ll need to gather.
For the Gingersnap Crust:
- 2 cups (200g) gingersnap cookie crumbs
- 1/4 cup (50g) packed light brown sugar
- 6 tbsp (85g) unsalted butter, melted
For the Pumpkin Cheesecake Filling:
- 32 oz (900g) full-fat block cream cheese, softened to room temperature
- 1 1/2 cups (300g) granulated sugar
- 1 can (15 oz / 425g) pure pumpkin puree (not pumpkin pie filling)
- 4 large eggs, at room temperature
- 1/2 cup (120ml) heavy cream, at room temperature
- 2 tsp pumpkin pie spice
- 1 tsp pure vanilla extract
- 1/4 tsp fine sea salt
For the Salted Caramel Sauce:
- 1 cup (200g) granulated sugar
- 1/4 cup (60ml) water
- 1/2 cup (120ml) heavy cream, warmed
- 4 tbsp (57g) unsalted butter, cut into small cubes
- 1 tsp flaky sea salt, plus more for garnish
Step-by-Step Instructions
Follow these detailed steps to create a flawless cheesecake from scratch. We’ll guide you through making the crust, mixing the filling, baking in a water bath, and finishing with a decadent caramel sauce.
- Prepare the Pan and Oven: First, preheat your oven to 350°F (175°C). Take two large sheets of heavy-duty aluminum foil and wrap the outside of a 9-inch (23 cm) springform pan. This creates a waterproof seal essential for the water bath later. Set the wrapped pan aside.
- Make and Bake the Crust: In a food processor, pulse the gingersnap cookies until they form fine crumbs. Alternatively, place them in a zip-top bag and crush them with a rolling pin. Transfer the crumbs to a medium bowl and stir in the brown sugar. Pour in the melted butter and mix until the crumbs are evenly moistened, resembling wet sand. Press this mixture firmly and evenly into the bottom and slightly up the sides of the prepared pan. Bake for 10 minutes. Afterwards, remove the crust from the oven and let it cool on a wire rack. Reduce the oven temperature to 325°F (160°C).
How to Mix the Perfect Pumpkin Cheesecake Filling
- Beat the Cream Cheese: In a large bowl using an electric stand mixer with the paddle attachment (or a hand mixer), beat the softened cream cheese on medium-low speed until completely smooth and creamy. This should take about 2-3 minutes. It is crucial to scrape down the sides and bottom of the bowl frequently to ensure there are no lumps.
- Add Sugar and Pumpkin: With the mixer on low, gradually add the granulated sugar. Continue to mix until the sugar is fully incorporated and the mixture is smooth. Next, add the pumpkin puree, heavy cream, pumpkin pie spice, vanilla extract, and salt. Mix on low speed just until combined, remembering to scrape the bowl again to catch any unmixed ingredients.
- Incorporate the Eggs: Add the room-temperature eggs one at a time. Mix on the lowest speed possible after each addition, just until the yellow yolk disappears. Importantly, do not overmix at this stage, as incorporating too much air can cause the cheesecake to puff up and crack during baking.
Baking and Cooling for a Crack-Free Finish
- Assemble for Water Bath Baking: Pour the creamy cheesecake filling over the cooled crust and spread it into an even layer with a silicone spatula. Place the foil-wrapped springform pan inside a large roasting pan. Carefully pour boiling water into the roasting pan, ensuring the water comes about halfway up the sides of the springform pan.
- Bake the Cheesecake: Carefully transfer the entire setup to the preheated 325°F (160°C) oven. Bake for 65 to 75 minutes. The cheesecake is done when the edges are set, but the center 2-3 inches still has a slight wobble (like Jell-O). It’s better to slightly underbake than overbake.
- Cool Down Slowly: Turn off the oven and crack the oven door open with a wooden spoon. Let the cheesecake cool slowly in the warm oven for one hour. This gradual temperature change is another key step to prevent cracking. After an hour, carefully remove the cheesecake from the water bath and the roasting pan. Let it cool completely to room temperature on a wire rack.
- Chill Thoroughly: Once at room temperature, cover the cheesecake loosely with plastic wrap. Transfer it to the refrigerator to chill for at least 6 hours, but overnight is highly recommended. This chilling period allows the cheesecake to set fully and the flavors to meld, resulting in the best texture and taste.
Making the Homemade Salted Caramel
- Cook the Sugar: In a light-colored, heavy-bottomed saucepan, combine the granulated sugar and water. Cook over medium heat, stirring gently only until the sugar completely dissolves. Then, stop stirring and let the mixture bubble until it turns a deep amber color, swirling the pan occasionally for even cooking.
- Finish the Sauce: Immediately remove the pan from the heat. Very carefully and slowly, whisk in the warmed heavy cream; the mixture will bubble up violently. Once the bubbling subsides, whisk in the cubed butter until melted and smooth. Finally, stir in the flaky sea salt. Let the caramel cool to room temperature before using.
- Garnish and Serve: To serve, run a thin knife around the edge of the chilled cheesecake before releasing the springform ring. Drizzle a generous amount of the cooled salted caramel sauce over the top. Garnish with an extra sprinkle of flaky sea salt if desired for that perfect finishing touch.
Baking Tips, Variations & Substitutions
Pro Tips for Perfect Results
- Room Temperature is Non-Negotiable: For a silky-smooth, lump-free cheesecake filling, your cream cheese, eggs, and heavy cream absolutely must be at room temperature. Cold ingredients do not blend well and will result in a clumpy texture. Set them on the counter for at least 2 hours before you begin.
- Don’t Skip the Water Bath: A water bath (or bain-marie) adds moisture to the oven environment. This helps the cheesecake bake gently and evenly, which is the best defense against cracks and results in a creamy, dense texture rather than a rubbery one.
- Avoid Overmixing at All Costs: Overmixing, especially after adding the eggs, whips too much air into the batter. This air will cause the cheesecake to puff up dramatically in the oven and then sink and crack as it cools. Mix on low speed and stop as soon as each ingredient is just combined.
- Patience in Cooling is Key: The slow cooling process—first in the turned-off oven, then on the counter, and finally in the fridge—is essential. Drastic temperature changes will shock the cheesecake and cause it to crack. Do not rush this process.
Easy Variations You Can Try
- Gluten-Free Salted Caramel Pumpkin Cheesecake: The filling is naturally gluten-free. To make the entire recipe gluten-free, simply substitute the gingersnap cookies in the crust with your favorite brand of gluten-free gingersnaps.
- Different Crust Ideas: If you’re not a fan of gingersnaps, you can easily substitute them with Biscoff cookie crumbs, graham cracker crumbs, or even crushed digestive biscuits.
- Add a Chocolate Drizzle: For an even more decadent dessert, melt some dark chocolate and drizzle it over the caramel layer before serving. The slight bitterness of the chocolate pairs wonderfully with the sweet caramel and spiced pumpkin.
Watch: How to Make It
How to Serve & Store Your Salted Caramel Pumpkin Cheesecake
This cheesecake is best served chilled, directly from the refrigerator, to maintain its firm, creamy texture. For an extra decadent treat, top each slice with a dollop of fresh whipped cream and an additional drizzle of warm caramel sauce. The contrast of creamy, tangy cheesecake with sweet, salty caramel is the star of the show. We think you’ll also love it alongside a hot cup of coffee or a spiced chai latte.
To store, cover the cheesecake tightly with plastic wrap or place it in an airtight container. It will keep well in the refrigerator for up to 5 days. For longer storage, you can freeze the cheesecake before adding the caramel topping. Wrap the plain, chilled cheesecake tightly in several layers of plastic wrap and then a layer of aluminum foil. It can be frozen for up to 3 months. To serve, thaw it overnight in the refrigerator before topping with freshly made caramel sauce for the best taste and texture. For another amazing make-ahead dessert, try our famous moist banana bread recipe!
Frequently Asked Questions
My cheesecake cracked! What went wrong?
Cracking is usually caused by one of three things: overmixing the batter (especially after adding eggs, which incorporates too much air), overbaking, or cooling the cheesecake too quickly (a sudden temperature change). To prevent this, always mix on low speed, bake just until the center has a slight wobble, and follow the slow cooling instructions carefully.
Can I freeze this Salted Caramel Pumpkin Cheesecake?
Yes, this cheesecake freezes beautifully. For best results, freeze it whole or in individual slices without the caramel topping. Wrap it very well in plastic wrap and then a layer of foil. It will last for up to 3 months. Thaw overnight in the refrigerator before serving and add the caramel topping fresh.
Can I reduce the sugar in this recipe?
While you can slightly reduce the sugar, it is not highly recommended. Sugar contributes not only to sweetness but also to the cheesecake’s tender, creamy texture and structure. Reducing it by more than 1/4 cup (50g) in the filling may result in a less creamy, more savory, and slightly drier texture.
Why do I need to use block cream cheese?
Block-style cream cheese has a lower water content and higher fat content than the whipped or tub-style varieties. Using block cream cheese is essential for achieving the dense, rich, and creamy structure that is characteristic of a perfect cheesecake. The spreadable kind will result in a soupy, unset filling.