
Homemade Strawberry Crunch Poke Cake: The Ultimate Easy Dessert
Estimated reading time: 8 minutes | Prep time: 45 minutes | Total time: Approx. 5 hours (includes chilling)
Key Takeaways
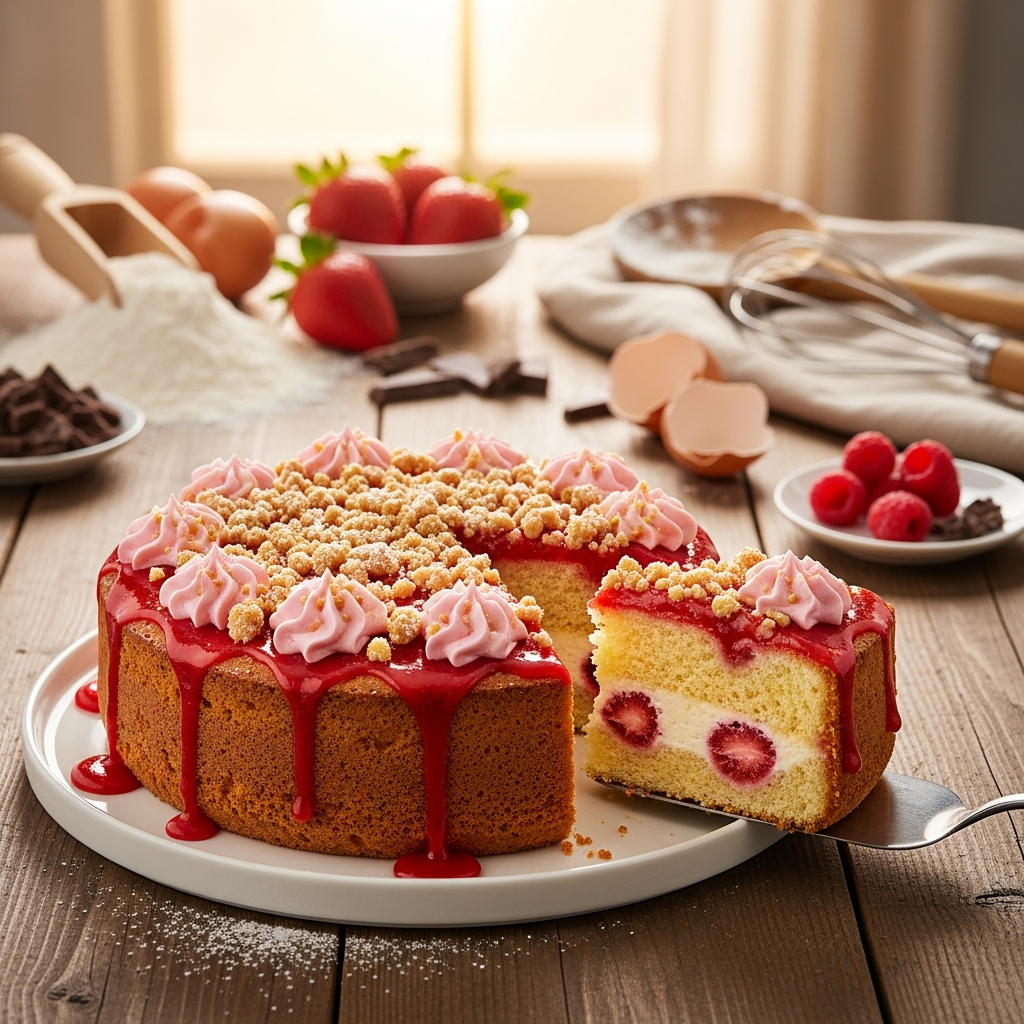
- Irresistible Texture & Flavor: This cake features four incredible layers: a moist vanilla cake, a sweet strawberry gelatin filling, a light cream cheese whipped frosting, and the iconic crispy strawberry crunch topping.
- Beginner-Friendly Recipe: With clear step-by-step instructions and an option to use a boxed cake mix, this is a simple recipe that delivers show-stopping results, making it perfect for bakers of all skill levels.
- Perfect Make-Ahead Dessert: The cake needs several hours to chill and set, making it an ideal choice to prepare a day in advance for parties, potlucks, or family gatherings.
- Versatile & Crowd-Pleasing: This family-friendly dessert is a guaranteed hit for any occasion, from summer barbecues to birthdays. Its nostalgic flavor is reminiscent of classic strawberry shortcake ice cream bars.
Table of Contents
Why You’ll Love This Strawberry Crunch Poke Cake Recipe
Get ready to fall in love with the ultimate dessert experience: the Strawberry Crunch Poke Cake. This recipe is more than just a cake; it’s a celebration of textures and flavors that come together in perfect harmony. From the soft, vanilla-infused sponge to the sweet rivers of strawberry gelatin that make every bite incredibly moist, this cake is designed to impress. We then top it with a cloud of light and tangy cream cheese whipped frosting and finish it with a generous layer of homemade strawberry crunch topping, reminiscent of everyone’s favorite childhood ice cream bar. This is the simple recipe that will have everyone asking for a second slice.
What makes this dessert truly special is its accessibility. While the result is a bakery-worthy creation, the process is straightforward and perfect for a family-friendly baking project. Whether you’re making the vanilla cake from scratch for that authentic homemade taste or using a boxed mix for a convenient shortcut, the outcome is consistently delicious. It’s the perfect easy dessert for potlucks, birthdays, or any summer gathering where you want a refreshing, crowd-pleasing treat. The combination of the chilled cake, creamy frosting, and crispy topping makes for a perfect texture that is simply unforgettable.
Ingredients You’ll Need
Using high-quality, room-temperature ingredients is the first step to achieving the perfect Strawberry Crunch Poke Cake. Here’s what you’ll need, broken down by component.
For the Moist Vanilla Cake
- 2 1/2 cups (300g) all-purpose flour
- 1 1/2 cups (300g) granulated sugar
- 1 cup (226g) unsalted butter, at room temperature
- 4 large eggs, at room temperature
- 1 cup (240ml) whole milk, at room temperature
- 1 tbsp baking powder
- 1/2 tsp salt
- 2 tsp vanilla extract
For the Strawberry Gelatin Filling
- 1 package (3 oz / 85g) strawberry gelatin mix (like Jell-O)
- 1 cup (240ml) boiling water
- 1/2 cup (120ml) cold water
For the Irresistible Strawberry Crunch Topping
- 1 cup (45g) freeze-dried strawberries
- 1 cup (120g) all-purpose flour
- 1/2 cup (100g) granulated sugar
- 1/2 cup (113g) unsalted butter, melted
- 1/2 tsp salt
For the Cream Cheese Whipped Frosting
- 1 1/2 cups (360ml) cold heavy whipping cream
- 4 oz (113g) full-fat cream cheese, softened
- 1/2 cup (60g) powdered sugar
- 1 tsp vanilla extract
Equipment Needed
- 9×13 inch (23×33 cm) baking pan
- Electric stand mixer or hand mixer
- Mixing bowls (large, medium, small)
- Food processor (or a zip-top bag and rolling pin)
- Baking sheet lined with parchment paper
- Wooden skewer or the handle of a wooden spoon
- Rubber spatula and wire rack
Step-by-Step Instructions
Follow these simple steps to assemble your stunning Strawberry Crunch Poke Cake from scratch. Each stage is broken down for clarity, ensuring a flawless result every time.
Part 1: Making the Vanilla Cake
- Step 1: Preheat and Prep. First, preheat your oven to 350°F (175°C). Next, generously grease and flour a 9×13 inch baking pan, or line it with parchment paper, leaving an overhang on the sides for easy removal later. This preparation is crucial to ensure the cake does not stick.
- Step 2: Combine Dry Ingredients. In a medium bowl, whisk together the all-purpose flour, baking powder, and salt. Whisking aerates the flour and ensures the leavening agent is evenly distributed, which leads to a more uniform rise. Set aside.
- Step 3: Cream Butter and Sugar. In a large bowl using an electric mixer, beat the room-temperature butter and granulated sugar on medium-high speed. Continue mixing for about 3-4 minutes until the mixture is light, pale, and fluffy. This step incorporates air into the batter, which is key for a tender cake crumb.
- Step 4: Add Eggs and Vanilla. Reduce the mixer speed to medium and add the eggs one at a time, beating well after each addition until it’s fully incorporated. Scrape down the sides and bottom of the bowl with a spatula as needed. After the last egg is mixed in, stir in the vanilla extract.
- Step 5: Alternate Wet and Dry Ingredients. With the mixer on low speed, add the dry ingredients in three parts, alternating with the milk in two parts. Always begin and end with the dry ingredients. (e.g., 1/3 flour, 1/2 milk, 1/3 flour, 1/2 milk, final 1/3 flour). Mix only until just combined; a few small lumps are okay. Be careful not to overmix.
- Step 6: Bake the Cake. Pour the batter into your prepared 9×13 pan and use a spatula to spread it evenly. Bake for 30-35 minutes, or until a wooden skewer inserted into the center comes out clean or with a few moist crumbs attached.
- Step 7: Cool and Poke. Place the cake pan on a wire rack and let it cool for about 20-30 minutes. The cake should be warm, but not hot. Use the round handle of a wooden spoon to poke holes all over the top of the cake, spacing them about an inch apart.
Part 2: Preparing the Crunch and Filling
- Step 8: Prepare the Strawberry Crunch. While the cake is baking, prepare the topping. Pulse the freeze-dried strawberries in a food processor until they form a coarse powder. Add the flour, sugar, and salt, and pulse to combine. Drizzle in the melted butter and pulse until a crumbly, sand-like mixture forms. Spread this onto a parchment-lined baking sheet and bake at 350°F (175°C) for 10-12 minutes, until lightly golden. Let it cool completely.
- Step 9: Prepare the Strawberry Filling. In a medium bowl or a 2-cup liquid measuring cup, combine the strawberry gelatin mix with 1 cup of boiling water. Whisk vigorously for about 2 minutes until the gelatin is completely dissolved. Then, stir in 1/2 cup of cold water to slightly cool the mixture.
- Step 10: Fill the Cake. Slowly and evenly pour the prepared strawberry gelatin mixture over the warm, poked cake. Tilt the pan gently to ensure the liquid seeps into all the holes. Transfer the cake to the refrigerator to chill for at least 3-4 hours, or until the gelatin is fully set and the cake is cold.
Part 3: Frosting and Finishing
- Step 11: Make the Whipped Frosting. In a large, chilled bowl, beat the softened cream cheese with an electric mixer until smooth and free of lumps. Add the powdered sugar and vanilla extract, mixing on low speed until combined. Scrape down the bowl. With the mixer still on low, gradually pour in the cold heavy cream. Once all the cream is added, increase the speed to medium-high and whip for 2-4 minutes until stiff, billowy peaks form.
- Step 12: Frost and Garnish. Spread the cream cheese whipped frosting evenly over the top of the fully chilled cake. Generously sprinkle the cooled strawberry crunch topping all over the frosting, covering the entire surface. You can gently press it down to help it adhere. Your amazing Strawberry Crunch Poke Cake is now ready to be sliced and served!
Baking Tips, Variations & Substitutions
Pro Tips for the Perfect Strawberry Crunch Poke Cake
- Room Temperature is Non-Negotiable: For the smoothest cake batter, ensure your butter, eggs, and milk are all at room temperature. This allows them to emulsify properly, creating a uniform structure and a tender, even crumb. Cold ingredients can cause the batter to curdle.
- Do Not Overmix the Batter: When you alternate adding the wet and dry ingredients, mix only until the flour streaks disappear. Overmixing develops gluten, which can result in a tough, dense, or dry cake. A light hand is key!
- Cool the Crunch Completely: Before sprinkling the strawberry crunch topping on the frosting, it must be 100% cool to the touch. Any residual warmth will melt the delicate whipped frosting and create a soggy mess.
- Poke Holes Generously: Use the handle of a wooden spoon for larger holes that can absorb more of the delicious gelatin filling. Space the holes evenly, about 1 inch apart, to ensure every single slice gets that signature moist, strawberry-infused flavor.
- Chill the Frosting Bowl: For the fluffiest, most stable whipped frosting, place your mixing bowl and beater attachments in the freezer for 10-15 minutes before you start. Cold equipment helps heavy cream whip up faster and hold its shape better.
Easy Variations You Can Try
- Different Flavors: Swap the strawberry gelatin for raspberry, peach, or orange for a different fruity twist. You can also match the freeze-dried fruit in the crunch topping to the gelatin flavor.
- Add White Chocolate: For an even more decadent crunch, mix 1/2 cup of finely chopped white chocolate into the crunch topping mixture after it has cooled.
- Lemon Twist: Add 1 tablespoon of fresh lemon zest to the cake batter and 1 teaspoon of lemon zest to the cream cheese frosting for a bright, fresh flavor that pairs beautifully with strawberry.
- Shortcut Version: As mentioned in the FAQ, using a boxed white or vanilla cake mix is a fantastic time-saver. Simply follow the package instructions for baking in a 9×13 pan and then pick up the recipe at Step 7.
How to Serve & Store Your Strawberry Crunch Poke Cake
This Strawberry Crunch Poke Cake is at its absolute best when served chilled, straight from the refrigerator. The cold temperature keeps the frosting firm, the cake perfectly moist, and the crunch topping crisp. For beautiful, clean slices, use a sharp knife and wipe it clean with a damp paper towel between each cut. While it’s a complete dessert on its own, a few fresh sliced strawberries on the side can add a lovely finishing touch.
To store leftovers, cover the pan tightly with plastic wrap or transfer individual slices to an airtight container. The cake will stay fresh and delicious in the refrigerator for up to 4 days. Note that the crunch topping will gradually soften over time as it absorbs moisture from the frosting, but it will still be incredibly tasty. For another fruity and refreshing dessert, try our Lemon Blueberry Loaf Cake recipe next!
Watch: How to Make It


Frequently Asked Questions
Can I use a boxed cake mix for this Strawberry Crunch Poke Cake?
Absolutely! Using a white, yellow, or vanilla boxed cake mix is a great time-saving shortcut. Simply prepare and bake the cake according to the package directions in a 9×13 inch pan. Then, let it cool slightly and begin with Step 7 (poking the holes) from the recipe above.
Can I freeze this cake?
Yes, this cake freezes well. For best results, freeze it after the gelatin has set but before you add the frosting and crunch topping. Wrap the entire pan tightly in a double layer of plastic wrap, followed by a layer of aluminum foil. It can be frozen for up to 2 months. Thaw it overnight in the refrigerator before frosting and decorating.
I don’t have freeze-dried strawberries. What can I use instead?
While freeze-dried strawberries provide the most intense flavor and color, you can substitute them. A good alternative is to use 1/2 cup of finely crushed, crispy strawberry wafer cookies or shortbread cookies. To get that classic pink color, you can add a drop of red or pink food coloring to the melted butter before mixing it into the dry ingredients for the crunch topping.
Can I reduce the sugar content?
You can slightly reduce the sugar in the cake batter by about 1/4 cup (50g) without a major impact on texture, though it might be slightly less moist. However, reducing sugar in the gelatin filling, crunch topping, or frosting is not recommended, as it is critical for the final taste, texture, and structure of each component.
Why is my crunch topping soggy?
A soggy crunch topping is usually caused by one of two things. First, the topping was not cooled completely before being sprinkled over the frosting, causing it to melt. Second, condensation in the fridge. To ensure maximum crispiness, store the crunch topping in a separate airtight container and sprinkle it over the cake just before serving.