The 1 Ultimate Fudgy Brownie Recipe (Tested 12 Times)
Prep: 20 min | Bake: 45 min | Total: 1 hr 5 min
Recipe Highlights
- The Secret Ingredient: A single teaspoon of red miso paste intensifies the chocolate flavor without adding any savory soup taste.
- Tested 12 Times: We dialed in the exact ratio of butter, sugar, and cocoa to guarantee a paper-thin crinkle top.
- No Stand Mixer Needed: Just a couple of bowls, a sturdy whisk, and pure baking passion.
- Unmatched Texture: Dense, fudgy, and incredibly rich—never cakey.
Table of Contents
- Why This Fudgy Brownie Recipe Actually Works
- The Science of the Crinkle Top
- Ingredients You Will Need
- Pro-Level Equipment
- How to Make Fudgy Brownie Recipe — Step by Step
- Masterclass Tips for Perfect Fudgy Brownie Recipe
- Variations and Flavor Twists
- Serving and Storage
- Watch the Baking Tutorial
- Frequently Asked Questions About Fudgy Brownie Recipe
Why This Fudgy Brownie Recipe Actually Works
Fudgy Brownie Recipe perfection is something I chased through twelve distinct, messy batches before finally nailing the ultimate chocolate experience. If you have ever baked a batch of brownies only to end up with a dry, cakey texture or a greasy mess that pools oil in the corners of your pan, you know the frustration. This Fudgy Brownie Recipe relies on a precise balance of fat, sugar, and cocoa solids to create a dense, chewy center that practically melts on your tongue.
During my testing phase, I realized that most recipes fall short because they treat chocolate as a single ingredient. In reality, chocolate is a complex structure of cocoa butter, sugar, and dry cocoa solids. To get that perfect texture, we have to manipulate these elements carefully. In batch four, I tried using only melted chocolate, which resulted in a heavy, almost clay-like brownie. In batch seven, I went the other way, using only cocoa powder, which made them dry and dusty. The breakthrough came in batch twelve when I combined both melted dark chocolate and high-quality Dutch-process cocoa powder, balanced by our secret weapon: red miso paste.
You might think miso paste belongs in a bowl of ramen, but in the pastry world, it is a brilliant flavor enhancer. Red miso is packed with natural glutamic acids. When paired with dark chocolate, it does not make the brownies taste like fermented soybeans; instead, it rounds out the sharp bitterness of the cocoa, highlights the fruity notes of the chocolate, and provides a deep, caramelized undertone that salt alone cannot achieve. It is the difference between a simple sweet treat and a dessert that stops you in your tracks.
The Science of the Crinkle Top
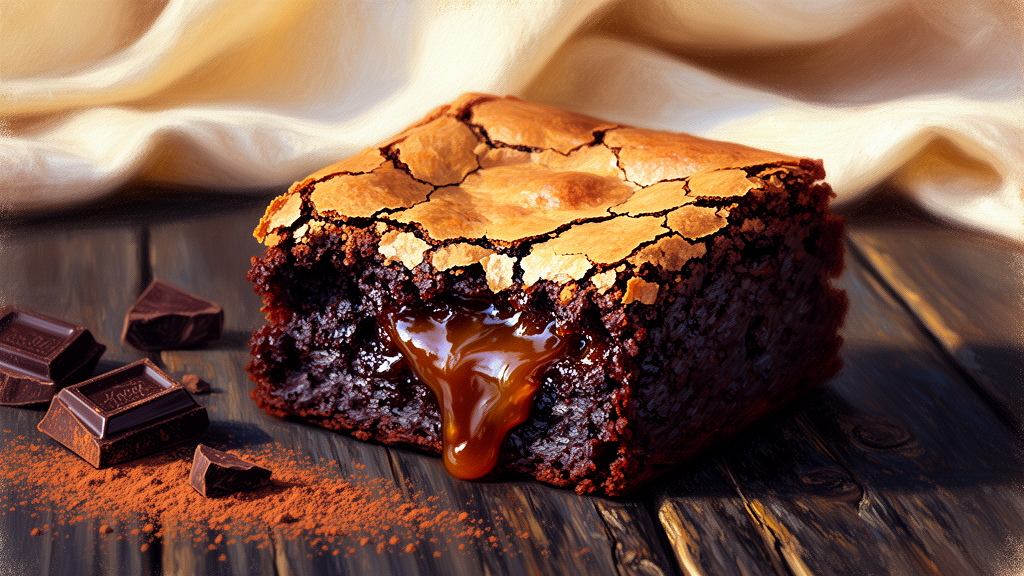
That beautiful, paper-thin, shiny crinkle top is the hallmark of a professional brownie. It is not a matter of luck; it is pure chemistry. That shiny skin is actually a very thin layer of meringue that forms on the surface of the batter as it bakes. To achieve this, we must dissolve the sugars completely into the eggs.
By whipping the eggs, granulated sugar, and brown sugar together for a full five minutes before adding the fat, we create a stable foam. The sugar bonds with the water in the egg whites, and as the brownie bakes, this mixture migrates to the surface, drying out slightly to form that coveted, crackly crust. If you skip this whipping step, your brownies will still taste good, but they will have a dull, matte surface instead of that gorgeous, reflective sheen.
Ingredients You Will Need
To achieve the absolute best results, every ingredient must be measured accurately. I highly recommend using a digital kitchen scale. A cup of flour can vary by up to thirty percent depending on how tightly it is packed, which can easily ruin the delicate balance of this recipe.
| Ingredient | US Measurement | Metric Measurement | Preparation State |
|---|---|---|---|
| Unsalted Butter | 1 cup (2 sticks) | 226 grams | Melted and browned |
| Dark Chocolate (70% Cacao) | 4 ounces | 113 grams | Finely chopped |
| Dutch-Process Cocoa Powder | 3/4 cup | 75 grams | Sifted |
| Granulated Sugar | 1 cup | 200 grams | Standard white sugar |
| Light Brown Sugar | 1 cup | 210 grams | Packed |
| Large Eggs | 4 whole eggs | 200 grams | Room temperature |
| Large Egg Yolk | 1 yolk | 18 grams | Room temperature |
| Red Miso Paste | 1 teaspoon | 6 grams | Smooth, no lumps |
| Vanilla Bean Paste | 2 teaspoons | 10 milliliters | Or pure vanilla extract |
| All-Purpose Flour | 3/4 cup | 90 grams | Sifted |
| Espresso Powder | 1 teaspoon | 3 grams | Fine powder |
| Semi-Sweet Chocolate Chunks | 1 cup | 170 grams | For folding in |
Pro-Level Equipment
You do not need a kitchen full of expensive gadgets to make this recipe, but using the right tools will make a massive difference in the final texture and appearance of your brownies.
- 8×8 Inch Metal Baking Pan: Avoid glass or ceramic pans at all costs. Glass is an insulator; it takes a long time to heat up and a long time to cool down. This results in overbaked, dry, cakey edges and a completely raw, undercooked center. A light-colored aluminum pan conducts heat rapidly and evenly, ensuring a uniform bake from edge to edge.
- Parchment Paper: Always line your pan with parchment paper, leaving a two-inch overhang on the sides. This creates a “sling” that allows you to lift the cooled brownies cleanly out of the pan for perfect, sharp slices.
- Fine-Mesh Sieve: Cocoa powder is notoriously prone to clumping. Sifting it along with the flour ensures that you do not end up with pockets of dry flour or bitter cocoa in your finished brownies.
- Digital Kitchen Scale: Precision is the foundation of pastry science. Measuring by weight guarantees that your brownies turn out exactly like mine, batch after batch.
- Large Balloon Whisk: A sturdy whisk is essential for whipping the eggs and sugar to the proper volume to create that shiny crinkle top.
How to Make Fudgy Brownie Recipe — Step by Step
Follow these steps carefully, paying close attention to the visual and sensory cues. Baking is as much about feeling and observing as it is about following instructions.
- Step 1: Brown the Butter. Place your unsalted butter in a medium saucepan over medium heat. Let it melt, then foam. Swirl the pan occasionally. You will hear a loud crackling sound as the water evaporates. Once the crackling stops and a quiet foam rises, watch closely. You will see tiny brown specks settle at the bottom of the pan, and the kitchen will fill with a rich, nutty aroma. Immediately remove the pan from the heat and pour the hot butter over your finely chopped dark chocolate in a heatproof bowl. Let it sit for two minutes, then whisk until completely smooth and glossy.
- Step 2: Whip the Eggs and Sugars. In a large mixing bowl, combine the room-temperature eggs, egg yolk, granulated sugar, and packed light brown sugar. Using a sturdy balloon whisk, beat the mixture vigorously for a full five minutes. The mixture should triple in volume, turning pale yellow and thick. When you lift the whisk, the batter should fall back into the bowl in slow, distinct ribbons that hold their shape for a few seconds before disappearing. This is the secret to the crinkle top.
- Step 3: Emulsify the Wet Ingredients. Whisk the red miso paste and vanilla bean paste directly into the warm butter and melted chocolate mixture until completely smooth. Slowly pour this chocolate mixture into the whipped eggs and sugar, whisking gently but continuously to combine without deflating the egg foam.
- Step 4: Sift and Fold. Place your fine-mesh sieve over the bowl. Sift in the all-purpose flour, Dutch-process cocoa powder, and espresso powder. Switch to a silicone spatula. Using a gentle J-fold motion, cut down through the center of the batter, sweep around the bottom of the bowl, and fold the batter over itself. Repeat this process just until the last streaks of flour disappear. Do not overmix, or you will develop gluten, which will make the brownies tough instead of tender.
- Step 5: Add the Chunks. Gently fold in the semi-sweet chocolate chunks until they are evenly distributed throughout the thick, glossy batter.
- Step 6: Prep and Bake. Preheat your oven to 325°F (163°C). Line your 8×8 inch metal pan with parchment paper, leaving an overhang. Pour the batter into the pan and smooth the top with your spatula. Bake on the middle rack for 35 to 40 minutes. At the 35-minute mark, insert a toothpick into the center. It should not come out clean, nor should it have wet batter. It should come out with a few moist, sticky crumbs clinging to it. That is the sweet spot for a fudgy center.
- Step 7: The Ice Bath Shock (Optional but Recommended). As soon as the brownies come out of the oven, carefully plunge the bottom of the hot baking pan into a shallow sink or larger pan filled with ice water (be careful not to let any water splash onto the brownies). Leave it there for 10 minutes. This rapid temperature drop stops the cooking process instantly, locking in that dense, fudgy texture and preventing the center from drying out from residual heat.
Masterclass Tips for Perfect Fudgy Brownie Recipe
To truly master this Fudgy Brownie Recipe, you need to understand the underlying science of baking. Here are three professional tips that will elevate your baking game:
- Control the Gluten Development: Gluten is a network of proteins that forms when flour meets liquid and is agitated. While gluten is fantastic for chewy sourdough bread, it is the enemy of a fudgy brownie. To keep your brownies dense and melt-in-your-mouth tender, we use a relatively low amount of flour and fold it in very gently. Once the flour is added, stop mixing the moment you can no longer see dry spots.
- The Role of Fat and Emulsification: A greasy brownie happens when the fat separates from the sugar and flour during baking. By browning the butter and whisking it directly into the chopped chocolate, we create a stable emulsion. The lecithin in the egg yolks also acts as a natural emulsifier, binding the fats and liquids together. This ensures that the butter stays suspended in the batter, resulting in a moist, uniform crumb rather than an oily pool.
- The Importance of Sugar Ratios: Granulated sugar is hygroscopic, meaning it attracts water, but it also crystallizes easily, which helps form the crispy top. Brown sugar contains molasses, which adds acidity and moisture, keeping the interior of the brownie incredibly soft and chewy. Using a 50/50 split of both sugars gives you the absolute best of both worlds: a perfect crinkle top and a dense, fudgy center.
Variations and Flavor Twists
Once you have mastered the classic version of this Fudgy Brownie Recipe, you can start experimenting with different flavor profiles. Here are a few of my favorite variations:
- Salted Caramel Swirl: Warm 1/4 cup of high-quality store-bought or homemade salted caramel sauce. After pouring the brownie batter into the pan, dollop the caramel over the top and use a butter knife to gently swirl it into the batter before baking. Sprinkle with flaky sea salt immediately after baking.
- Tahini and Sesame: For a nutty, sophisticated twist, swirl 3 tablespoons of smooth tahini paste into the top of the batter. Sprinkle with a tablespoon of toasted black and white sesame seeds before sliding the pan into the oven. The bitterness of the sesame beautifully balances the sweetness of the chocolate.
- Spiced Mexican Chocolate: Add 1 teaspoon of ground cinnamon and 1/4 teaspoon of cayenne pepper to the dry ingredients before sifting. The subtle heat of the cayenne warms the back of your throat and intensifies the rich chocolate flavor.
- Bourbon and Pecan: Fold 1/2 cup of toasted, chopped pecans and 1 tablespoon of high-quality bourbon into the batter along with the chocolate chunks. The oaky, vanilla notes of the bourbon pair beautifully with the browned butter.
Serving and Storage
How you handle your brownies after they leave the oven is just as important as how you bake them. For the cleanest, most professional-looking slices, you must let the brownies cool completely in the pan at room temperature for at least two hours, then transfer them to the refrigerator for another hour. Once chilled, lift them out using the parchment sling. Run a large chef’s knife under hot water, wipe it completely dry, and make one clean slice. Wipe the blade clean with a damp cloth, re-heat the knife, and repeat for every single cut. This prevents the fudgy center from sticking to the blade and tearing the brownies.
Store your sliced brownies in an airtight container at room temperature for up to 4 days. If you prefer an even denser, almost fudge-like texture, store them in the refrigerator for up to a week. They taste incredible cold straight from the fridge!
For long-term storage, wrap individual brownie squares tightly in plastic wrap, then place them in a heavy-duty freezer bag. They will keep beautifully in the freezer for up to 3 months. When a craving strikes, simply let a square thaw at room temperature for 20 minutes, or pop it in the microwave for 10 to 15 seconds for a warm, gooey treat that tastes like it was just baked.
If you are looking for a stunning homemade gift, stack four or five brownie squares in a small cellophane bag, tie it with a rustic piece of twine, and tuck in a sprig of fresh rosemary or a cinnamon stick. It is a simple, elegant present that anyone would be thrilled to receive.
Watch the Baking Tutorial
Frequently Asked Questions About Fudgy Brownie Recipe
- Q: Why are my brownies cakey instead of fudgy?
A: Cakey brownies are usually the result of too much flour, too many eggs, or the addition of chemical leaveners like baking powder or baking soda. This Fudgy Brownie Recipe contains absolutely no chemical leaveners and uses a very low ratio of flour to fat and sugar, ensuring a dense, rich texture. Also, make sure you do not overbake them; keep a close eye on the toothpick test! - Q: Can I use cacao powder instead of Dutch-process cocoa?
A: I do not recommend it. Dutch-process cocoa powder has been treated with an alkalizing agent to reduce its natural acidity, giving it a darker color and a smoother, more mellow flavor. Natural cocoa or raw cacao is much more acidic and astringent, which will alter the texture and make the brownies taste sharp and dry. - Q: What does the red miso paste do in this Fudgy Brownie Recipe?
A: Red miso paste acts as a powerful flavor enhancer. It is rich in umami, which deepens the natural complexity of the dark chocolate, cuts through the intense sweetness of the sugars, and adds a subtle, caramelized depth that makes the brownies taste incredibly professional. - Q: Can I make this recipe gluten-free?
A: Yes! You can easily substitute the all-purpose flour with a high-quality 1-to-1 gluten-free baking flour blend that contains xanthan gum. Because brownies rely on a very low amount of flour and do not need a strong gluten structure to rise, they adapt beautifully to gluten-free substitutions. - Q: How do I get that shiny crinkle top on my brownies?
A: The shiny crinkle top is achieved by whipping the eggs and sugars together vigorously for a full five minutes before adding the other ingredients. This dissolves the sugar completely and creates a delicate, meringue-like layer that rises to the surface during baking. - Q: Can I double this Fudgy Brownie Recipe?
A: Absolutely! You can double all the ingredients and bake them in a 9×13 inch metal baking pan. Keep in mind that the baking time may increase slightly, so start checking for doneness at the 40-minute mark.